Tuesday, January 4, 2011

Anchor Installment #1 - Trees

This installment depicts a variety of ways to anchor off a tree.


Keep in mind, that the goal for all anchors is "SERENE".

SERENE
  • S - Strong (or Solid) - The stronger the better
  • E - Equalized - Anchors should be constructed so that each component of the anchor carries an equal amount of the load
  • R - Redundant - Anchors should consist of multiple components in case one or more components fail
  • E - Efficient - Anchors should be as simple and timely as possible without giving up any of the other SERENE qualities
  • NE - No Extension - Anchors should be built so that if one or more of the components fail the remaining components won't be shock loaded 
Solid, Equalized, Redundant, Efficient, and No Extension. Above all else, anchors must be Solid. Complete anchor failure often means death to you, your partner or both. Get proper training and practice anchors on the ground before you go out and try them in a climbing setting.

To anchor off a tree, there are a few rules of thumb you might want to keep in mind. These include (1) make sure the tree is alive, (2) keep the anchor as low as possible, (3) be sure it's at least as large as your thigh, and (4) be sure it's firmly rooted in dirt (not 4" of dirt on top of solid rock!). Before you commit yourself and your partner/s to a tree be sure to push on it and make sure it doesn't move or break. Be careful not to fall over the edge if it gives way while you're pushing it! Also, check for sap and any sharp rocks that might be near the tree. You can use an old piece of carpet (or your partners favorite sweatshirt) to protect the rope, slings or tree.

Note - if you're Top Roping off a tree anchor, add another carabiner (preferably a locker) at the master point. These pics only show 1 for clarity. Also, when tying in with a clove hitch, be sure to orient the "load strand" toward the back of the 'biner for maximum strength. And don't forget to lock the 'biner and tighten the clove hitch before you lean into it.

Tools needed: A couple of locking 'biners, slings, and a rope.

Option #1 - Double Length Sling: Wrap a double length sling around the tree and close it with a locker. This is OK. It's Strong (assuming it meets the "rules of thumb" above), it's Efficient, it's Equalized but it's NOT redundant. I would add a 2nd double length sling if I had one. You can also girth hitch two single length slings together. 


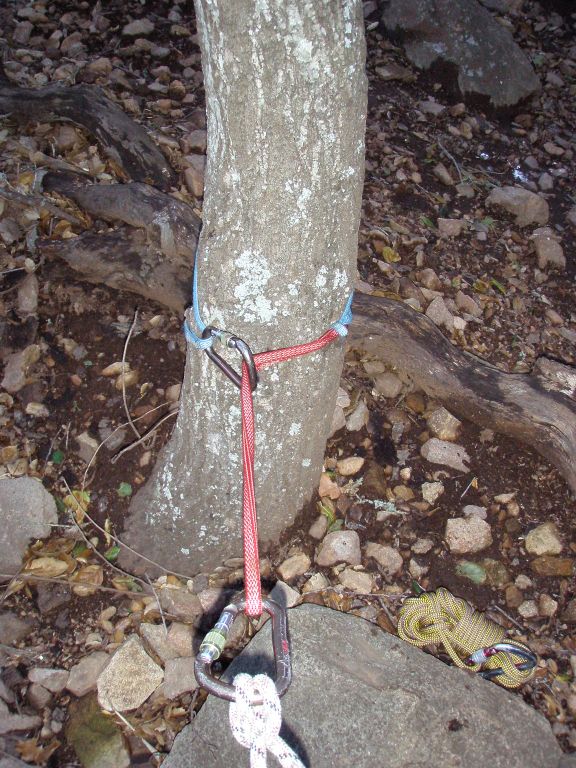
Option #2 - Single Length Sling: I guess this would work in a pinch if that's all you had. But it's bad for all kinds of reasons. It cross loads the 'biner, it's high on the tree (because it was too short to go around the base), and it's not redundant. Better add another sling.


Close up showing the 3-way cross loading of the 'biner. This dramatically reduces the strength of the 'biner. If you forgot to lock the gate, the 'biner could blow apart in a hard fall. Not good.


Option #3 - Add a 2nd Single Length Sling: Again, this would probably work in a pinch but it's still got some serious issues. It's not redundant and it has a "pulley effect" the way it's threaded through the 'biner. The pulley effect puts unnecessary force on the anchor.


Option #4 - 2 Single Length Slings Girth Hitched: These 2 slings are girth hitched together. Much better but still not redundant and the slings put a bit of cross loading on the 'biner.
Option #5 - 2 Slings, Crossed Over: To remove the cross loading by the slings, simply cross over the slings (like you were tying your shoes). Still not redundant but much better. If you had enough slack in the end of the slings you could tie them in an overhand knot and make them redundant.


Option #6 -Open Sling or Cordellete: If you have 1" tubular webbing or a cordellete, you can simply open it up and tie it around the tree. Use a water knot on the webbing and an overhand knot in the Cordellete. I recommend 8 millimeter Cord or 1" tubular webbing for this purpose. It's rated at over 3,000 lbs. Note - Don't use 1/2" webbing. It's only rated for 1,000 lbs. - which sound like a lot but a top rope fall could easily generate 1,000 lbs. of force. This setup is good but still not redundant. If you had a couple more slings, you could add them both.


Option #7 - Doubled Cordellete: Finally some redundancy! This meets all the SERENE requirements and rules of thumb. It's quick and simple. Just wrap the Cordellete (or 1" tubular webbing) around the tree twice and tie an overhand knot or Figure 8 knot in the end. If any single line were cut, the whole thing would hold together.

Option #8 - Rope: Take a BIG bight of rope, wrap it around the tree and tie it into a bowline. Don't know how to tie a bowline? Better learn before you climb in an area that requires tree or rock anchors. Practice it in your backyard and have the neighbor kids pull test it before you head out to the rocks.

Close up of the bowline knot. Note - this is turned around 180 degrees from the pic above (sorry for the confusion!). This setup would be even better if it was tightened and had a stopper knot tied behind the loose end. This setup is efficient but uses a LOT of rope. To get a redundant master point (aka power point) in the rope, simply tie an overhand or Figure 8 knot in both ends of the rope between you and the bowline knot.


Option #9 - Tree Wrap: So what do you do if it's late, you're tired and can't remember how to tie a bowline in the dark (much less remember your own name)? Just walk around the tree, tie a Figure 8 knot in the end of the rope and clip it back into your belay loop or harness. I know what you're thinking, "But it's NOT redundant!" Well it doesn't need to be redundant, it's ROPE! The rope can literally hold you, your partner AND your truck without much trouble. If you have enough rope, you can add a Master Point by bringing both ends together between you and the tree and tying a Figure 8 or overhand knot. Assuming you chose this scenario because you can barely remember your name (or were nearly out of rope) you can also belay directly off your harness. Often times, simple is best.

Stay safe and have fun!

John

Sunday, January 2, 2011

Anchor Installment #3 - Bolts

It was raining today, so I spent a little time creating a blog that demonstrates some options to set up bolted anchors. NOTE - Internet research is no substitute for proper instruction. Be to take a class, read books, talk to other climbers, and get out and practice your anchors!

In an effort to help remember how to properly set anchors, many people use the acronym "SERENE".


SERENE
  • S - Strong (or Solid) - The stronger the better
  • E - Equalized - Anchors should be constructed so that each component of the anchor carries an equal amount of the load
  • R - Redundant - Anchors should consist of multiple components in case one or more components fail
  • E - Efficient - Anchors should be as simple and timely as possible without giving up any of the other SERENE qualities
  • NE - No Extension - Anchors should be built so that if one or more of the components fail the remaining components won't be shock loaded 
I've included some typical scenarios below. 

1. Two Solid Bolts Evenly Spaced: This bolted setup is one of the simplest to build and is quite common at most crags. All you need is two equal length slings and 4 carabiners. At least 2 of them should be "lockers". At the very least, be sure there is at least one locker on the master point (the point where the rope goes through).


2 - Two Solid Bolts Slightly Offset: If the bolts are slightly off-set you can add an overhand knot or a figure 8 knot into the longer sling. This should equalize the anchor point so the weight is evenly distributed on both slings.


3 - Two Solid Bolts Slightly Offset: If the offset is only minor, you can add a couple wraps on the carabiner to the longer sling. Make the wraps on the locker if you have a choice.


4 - Two old bolts & 1 new bolt: This scenario tends to occur in back country settings where the bolts have to be hand drilled. Rather than pull the two old bolts and replace them, the bolt replacer has chosen to simply add a single new bolt. You could simply clip only 2 bolts (the new one and the best looking of the old ones) but it's better to add both old bolts into the system and having them equalized. This rigging uses a single length runner on the old bolts with an overhand knot in the middle of it. In order to be redundant on the old bolts, be sure to clip into both loops so if either old bolt pulls out, there will be no "Extension". This rigging uses 4 carabiners, 1 shoulder length sling and one double length sling. Pretty efficient and most climbers have at least one double and one shoulder length sling. Take your time adjusting the knots so that everything is equalized. This setup could be slightly better by extending the left leg of the blue sling so that more of the weight is taken up by the new bolt.


5 - Two old bolts and 1 new bolt: This is the same bolt arrangement as above but rigged with a 20' cordellete instead. Note that this rigging uses one less carabiner (but you have to remember to bring a cordellete). Weight the system with body weight then make any final adjustments before you use it. Some people worry about whether they should clip the bolts or the chain or chain links attached to the bolts. The answer is that it usually doesn't matter. Most of the metal hardware you run into at the crags is stronger than the rope or sling that's attached to it. If you have any doubts, then just clip the bolts. WARNING - Sometimes rap anchors are extended with "fixed slings". Never trust fixed slings for an anchor and always clip the bolts. Better yet, bring a knife and cut the old fixed slings off and replace them with chain. 

 
 6 - Two solid bolts, setback from the edge: Many times you need additional length to get over to the edge. The cordellete is your best option in this case. This is super quick and easy to untie. Use a Figure 8 or an overhand knot in the end with the master point. Add at least one locker and one non-locker (with gates opposed) to the master point.


7 - Two Solid Bolts, set way back from the edge: Sometimes you need even more length. With a 20' cordelette, you can untie it and extend it quite a distance. The bolt ends have Figure 8 Knots in them. Be sure to use 8 millimeter nylon cord since you have only 1 strand going to each bolt. At the master point, you'll need to tie a BHK, or Big Honkin' Knot. This is simply an overhand knot with one side folded back. Google "BHK Climbing Knot" and you'll find info. on how to tie these.


8 - Two Solid Bolts: This is the same bolt arrangement as before but the BHK has been moved up to bring the master point closer to the bolts. Using the BHK you can quickly move the master point further or closer to the anchor. The BHK results in an extra "leftover" loop. If it's short leave it hanging free. If it's long, you can bring it up and clip it to one of the carabiners on the bolts or tie it in an overhand knot on one of the other cords. 

Sunday, December 12, 2010

Another! Machete Linkup - Lucky 13 to Old Original via Rock Around the Clock

It's Pinnacles Season! I have to get in as many routes as I can before the Raptor Closures (which usually start in January). I was there Thursday with Vickie G. to do the Lucky 13 to Red Line Linkup and yesterday (Saturday) Bryan Carroll and I went there to finish the full linkup to the top of Machete. Including the traverse pitches there was something like 10 pitches. 
  1. P1/P2 - Linked Lucky 13 to P2 of Alias Bandit Bench. Lots of rope drag!
  2. P3 - Red Line (5.7R)
  3. P4 - Traverse (3rd/4th Class) to base of Rock Around the Clock
  4. P5 - Rock Around the Clock (5.9/A1)
  5. P6 - Rock Around the Clock 2nd Pitch (5.8/A1)
  6. P7 - Rock Around the Clock 3rd Pitch (5.3-ish)
  7. P8 - Traverse to Meadow (3rd/4th Class)
  8. P9 - Traverse and Simulclimb Rappel Bypass (4th Class/5.3)
  9. P10 - Old Original (aka the Reverse Traverse - 4th Class/5.5-ish) to the top of The Hideout. 
  10. Rap down the Hideout and hike down the 4th Class back to the base of Dos Equis.
On the way in, I noticed a "leaver 'biner" that's been hanging there for over a month. Last time I was there with Mark S. he wanted to go get it. It was dark and raining so I talked him out of it. Every time I see it I think of Mark so I have now named it "Mark's 'Biner". 

Here's the classic "last seen alive shot" I took of Bryan on the way in. That way I'll have something to send to him mom in the unlikely event...

Now for the climbing. We racked up at the car so we are on the rock by 11am. I get to lead Lucky 13 and linked it through the traverse pitch to the base of Red Line.  The end of the Traverse Pitch was quite wet. I pre-chalked my foot holds before I stepped across the wet streak.Yikes!
Bryan takes the sharp end and heads up the Red Line (5.7R). This 180' pitch is becoming one of my favorite 5.7s but it's still a bit loose in spots (as Bryan soon discovered). This climb was put up by Robert B., Jeff Gilbert and Dennis Erik Strom in 2004. Tell your friends to climb it so it gets cleaned up!

Shortly after I took this picture, Bryan goes to clip the 2nd bolt but a foothold blows out before he makes the clip. He's about 10' out from his clip and looking at a 20' fall onto the belayer (me!). I see the drama and suck in slack like a mad man. He slides back down to the first bolt and somehow manages to self arrest his own fall (with a little assistance from the belayer).
With the adrenaline pumping he manages to head back up and finish the pitch with no more drama. Welcome to the Pinnacles!

Bryan getting it done. 

Lost in a see of lichen and somewhat loose rock.


I get the short 3rd/4th Class traverse (mucho exposed!) and head to the base of Rock Around the Clock (5.9/A1). We decide to take a snack break and enjoy the views and the cool "hanging meadow".

Pic of some worked over, old guy that was also at the belay. Balconies in the background. We hear the unmistakable "tap, tap, tap" of a drill coming from the Balconies. Hmmm, new route development in progress? 
I get the 5.9/A1 pitch going without much trouble. BIG reaches between the bolts requiring me to precariously top step in aiders on overhanging terrain. The whole time I'm thinking, "will this fifi hook suddenly let go?" If it does, at least it will be quick! 

This short, steep pitch has one "mandatory" 5.9 free move right in the middle of the aid section. I switch my brain from "aid mode" to "free mode" and easily pull the move. A fall on the free move would leave me hanging in space above my belayer. It would be scary but at least I wouldn't hit anything! 

 Bryan comes just getting ready to pull the free move.

Bryan keeps the aiders tucked in for the last A1 moves and "french frees" the A1 like a true aid climber. I make him stop so I can take a quick pic. 

Bryan leads off the next pitch rated 5.8 in the Young Guidebook. We discover quickly that there are still several aid moves off the belay before we reach the 5.8. A good reminder that guidebooks are "just a guide". Bryan uses his newly acquired "french free technique" and busts out the moves and reaches the belay in no time. I think this was actually my favorite pitch. 

From the belay we have 2 choices. This cool water streak (rated 5.2) OR 

This other water streak rated 5.8. I'm a bit worried about the thick layer of lichen on the 5.8 and the moisture so I bail out right on the 5.2. I think it's more like 5.3 but who's going to argue about the difference between 5.2 and 5.3. Maybe 5.3+ or 5.3d? Don't want anyone to think we sand bagged the rating on the last pitch. 

Bryan coming up to the final belay after the 5.2+. Only 1 bolt protects this final pitch up the front side. A lead fall here would be unwelcome to say the least!

Bryan in "bandit" mode.

Pic of some old guy with a cool view of some of the features on the way in (the Shepperd and the Elephant are left of my head in the pic).

Bryan takes the next "pitch" of 3rd/4th Class to another small, hanging meadow. Note the use of the "alpine style" hip belay.  

After that we head over the top of Machete doing the "Reverse Traverse" and rap down The Hideout. Here's us safe and sound back on the trail. Bryan and I bust out our "X-Country Skills" and we run/rock ski the 1/2 mile of the the 3rd Class descent in about 5 minutes. I can't believe it, but we're actually hiking out while it's still light! Maybe I'm getting faster!


We make the parking lot by 4:30 and run into this character in the parking lot. He asks me if I know Theron Moses. Turns out I do! He demonstrates the proper use of the new D5 Hammer for removing rotten teeth.

Turns out this guy is Mungeclimber. He's one of the authors of the Red Line route that we just did! He's with pinnacles "legends" Bob Walton, James McConachie, and Brad Young. They were working on a new route above the Balconies. They are drinking beer in the parking lot and I manage to bum 1/2 a beer off Brad Young and invite myself to dinner with them in Soledad. A great way to finish the day!

Friday, December 10, 2010

Pinnacles - Lucky 13 to Red Line Linkup on Machete

Another great Pinn trip to Machete Ridge on the west side of the Monument. About 1/2 way to Soledad it started raining but stopped as we pulled into the parking lot. We ended up going for a hike in the morning hoping the sun would come out and dry things off.

Weird, wild, wet moss. Cool to look at but bad for rock climbing.


I like the carabiner sign post and map. Maybe we should bolt a sign at the base of each climb stating the grade, number of bolts, and notes for loose rock!


Look closely at the orange/red dots. They're lady bugs. The pathway was covered with them! 


 After lunch we decided it was dry enough to climb and headed back to the car. I opened the door and this little guy landed on it.

 At one point, he actually flew into my car! Unfortunately I was not fast enough with the camera.


Our objective. A linkup of a couple of moderate free routes. Lucky 13 to the traverse (Pitch 2 of Alias Bandit Bench) to Red Line. 


I led Lucky 13 and had the camera with me. The book says it's 5.9 but the start has a bouldery move that's more like 5.10b. I made the first clip, go to clip the 2nd and my handhold breaks off and I fall back to the first bolt. Welcome to Pinnacles where the rock and grades are constantly evolving!

I linked Lucky 13 and the traverse into 1 pitch (with monster rope drag) and hand over the lead to Vickie to do the 5.7R Red Line.


Lost in a sea of crusty lichen. The climbing isn't hard, you just have to figure out which hand holds and foot holds are solid and which ones will blow out. More of a game of "eliminate" than anything else.


Vickie bumping her head into the sky.Vickie finds a leaver biner on bolt #2 of Red Line.
The top or Red Line ends at the head wall for Bills Bad Bolts and Rock Around the Clock. Both A1 aid climbs. I plan to head there on Saturday with Bryan Carroll so we can bust out the whole linkup to the top of Machete.

You can see how the head wall is seriously overhanging.

We work out right (staying roped) over a bit of seriously crusty, loose and exposed 4th Class to a cool "hanging meadow". 

I decide to go after a "leaver biner" on bolt #1 of Rock Around the Clock (just can't help myself) and nearly step down onto this loose "nugget". Vickie's watching me and says, "Don't step on that it looks loose." I work my way around it then gently nudge it with my hand only to find out that it's just barely sitting there and ready to dislodge itself onto climbers and hikers below. I downclimb with the nugget and find a safer place for it.  We now have 2 leaver biners in our possession.


Looking back at the Balconies from the meadow. 

As always, we hiked out in the dark. Only this time we forgot our headlamps! Fortunately, we were on the trail and not the rock when it got dark.

Another great day at Pinnacles!

John